Our hosting solutions are engineered for powerful and reliable performance online. From shared and dedicated hosting to SSL certificates and web security and backup, you can rely on our solutions to provide 99.5% uptime and availability whenever, wherever!
Our IT specialists provide your business with solutions to help with common software and hardware issues across all devices whether on desktop, laptop, or on mobile.
In this digital age, a well-designed website is a game changer. But "well-designed" doesn't just mean aesthetics, but overall user experience. We create highly-functional websites that can support your business objectives -- whether that means driving awareness, lead generation, or even sales.
The phpMyAdmin is a third-party tool to manage tables and data inside a database. It is graphical user interface to manage MySQL databases. You can manually create Tables, Import and Export data or edit the values of a row through it.
To access phpMyAdmin
Click on the phpMyAdmin link, which can be found under the databases section of cPanel Home.
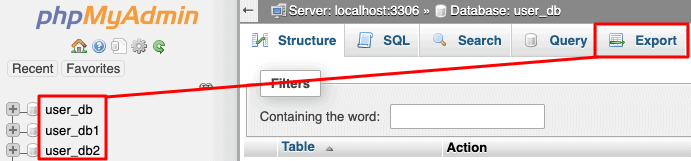
You will see a dashboard similar to this.
On the left-hand pane, there is a list of databases, which can be expended to see the table in each database. On the right hand pane, there is general information of Database server.
MySQL is the most popular Open Source SQL Database management system. To manage a huge volume of data efficiently, we store the data in tables, a group of many tables can be created in a single database. This interface allows you to create and manage the existing MySQL databases.
If you are creating a PHP based application or any application that uses a database, then you will need to create a database and a database user to access this database. To use WordPress, Drupal, Joomla or any other CMS, you will need to create a MySQL database before installing these CMS.
To create a new MySQL database, you need to open MySQL interface by clicking MySQL Databases link, which can be found in the Databases section of cPanel Home.
Create a New Database
When MySQL Databases interface will open, first thing you will see is Create New Database Section as shown below.
To create a database, simply enter the name of the database you wish to create and then click Create Database Button. You will now get a success message that the database is added.
Note − cPanel will automatically add a prefix to your database name you enter. So that there is no ambiguity in databases as in shared hosting environment. There are many users and there cannot be same name for two databases, thus your database name become Prefix_dbName. When connecting the database with web application you will need to use Full Name of database.
Add a Database User
To use your newly created database in your application, you will need to create a user and grant it all the privileges to modify the data in Database.
To create a Database User, scroll down to the end in Interface of MySQL databases. There you will see MySQL users, under it there will be Add New User, as shown below.
Step 1 − Enter a username according to your choice and choose a strong password. Click Create User to create a new user. You will get a success message “You have successfully created a MySQL user.
Note − Full username of your database user includes prefix and the username you provided.
As we have created a database user, now we will need to add the user to access the database.
Step 2 − Scroll down to find “Add User to Database”.
Step 3 − Select the User and database you wish to associate together. Click Add button and you will see the following screen.
To provide all the privileges to the user, select ALL PRIVILEGES checkbox and all the checkboxes will automatically get selected. Click Make Changes to save the changes.
Modifying a Database
The data stored in MySQL may get corrupted over time. There are many reasons for which this might happen. While using the Database in web application, if we see any database related error, we need to repair the database to repair the corrupt data. But before we repair our database, we will need to find the table on which our data is corrupted by checking the database for errors.
There are two operations we can perform to troubleshoot database related errors. To perform these actions, we need to scroll to Modify Database Options in MySQL Database Interface, screenshot for Modifying Database is shown below.
Check a Database
With this feature of cPanel Database, you can find which table in the Database is corrupted.
To check a database, we need to perform the following steps.
Step 1 − Select the database you want to check, from the dropdown menu of Check Database, as shown above.
Step 2 − Click the Check Database button.
Step 3 − cPanel will now run an automated script to find the corrupt table in the Database. If any corrupt table is found, it will display the name of the Table, otherwise it will display a success message.
Repair a Database
This database tool helps in automatically repairing of corrupt data or table from the database.
To use this tool, we need to perform the following steps −
Step 1 − Select the database having corrupt data from the dropdown menu.
Step 2 − Click Repair Database button.
Step 3 − cPanel will now run an automatic script to repair the corrupt data or table from the database, if it succeeds, it will give you a success message. If it fails to repair the database, it will show you an error with the table name on which the error occurred.
Many cPanel web hosting comes with this ClamAV virus scanner feature to guard against potential threats on your server. You can run on-demand scan of your files to see if they are infected with any virus or not. ClamAV is an open source powerful antivirus, it uses its extensive database to detect several types of potential threats like viruses, Trojan horses, malwares, malicious scripts etc.
You can scan different sectors of your home directory using the antivirus. To scan your account with a virus scanner, use the following steps.
Step 1 − Open cPanel Virus Scanner by clicking the Virus Scanner link in the Advanced section of the cPanel home.
Step 2 − You can choose the scan type from here.
Scan Entire Home Directory − This option will scan your entire cPanel account. If you choose this option, no need to run the scan on other options. This will scan your home directory, which contains the Emails, FTP accounts and Website.
Scan Mail − This option will scan your emails for viruses. If somebody sends a malicious email having some virus or malware, this virus scanner will tell you that.
Scan Public FTP Space − This option will scan your public_ftp folder. If somebody uploaded a malicious file through FTP, virus scanner will find it.
Scan Public Web Space − This option will scan your public_html in which all your front end files reside.
Step 3 − Click Scan Now button to start the scan and it will automatically show you the results.
If the Virus Scanner finds any malicious software, then it will give you options to correct the error. You may choose the option accordingly.
Note: Virus Scanner takes time specially when your cPanel account has a lot of files and directories. It is recommended to perform virus scanning during off-peak hours.


You must be logged in to post a comment.